Creating an entry
Learn more about how to create an entry.
You can add content to your journal by submitting an entry. The teacher has beforehand determined what content you are allowed to submit. This is done with templates which function as a blueprint for the entry's structure.
Your teacher may have also defined intermediate deadlines for future activities in your journal. These require you to submit an entry at a specific moment in time.
Learn more about entries, templates, and intermediate deadlines
After navigating to your journal, you can start creating entries. On the left-hand side, you can see your timeline. This provides an overview of the entries that you created (or are working on), together with the deadlines that you still need to complete.
Learn more about how the timeline works
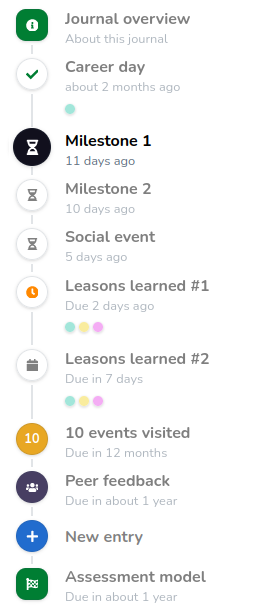
A simple example of a timeline
This example contains a timeline of the following activities (in order):
- The start of the assignment. This containing information like the description, due date, and possible points
- A graded entry, which can be identified by the checkmark.
- Three ungraded entries, of which the first one is selected, hence the black background.
- An unfilled deadline. The student did not provide any content for this entry. The due date is also passed, but not yet the lock date, hence the orange clock.
- An upcoming deadline. The student did not provide any content for this entry, but the due date is also not passed which can be identified by the "in 7 days" and the calender icon.
- New entry button. The student is allowed to add an entry to their journal. This is done via this button. This is not visible for teachers.
- A progress goal. The teacher expects students to have acquired 10 points in 12 months.
- A peer feedback moment. After the goal has been achieved, the teacher expects students to provide peer feedback over their journal.
- The end of the assignment. This contains the due- or lock date of the assignment. This also contains the overall assessment if the teacher created one.
Template selection
By clicking New entry in the timeline, you are presented with the template selection menu. Templates are configured by your teacher and function as a blueprint for your entry.

In this example, you can see that the user is allowed to create any of the above predefined templates.
To know what content needs to be provided for each of the templates, you can click the 'Preview' button.
For some templates, you can see that this template has been already been used some amount of times. This is visible when the teacher configured a maximum amount of uses. After you used them all, you cannot create new entries with that template.
Click 'Add' on one of these templates to start working and add it to the timeline. Any new work begins as a draft. The content of a draft is only visible to you.
Working on an entry
Once you have selected the template you would like to work on, a draft is added to your journal. While working on this draft, your changes will be saved automatically.
Info
The entry is always started as a draft and is not visible to your teachers until you submit it. You can always recognize that your entry is still a draft via the banner at the top of the entry or the blue background in the timeline.
See what a draft looks like

A template consists of a set of fields, each representing a type of content (text, image, etc) you are asked to provide content for. They may be accompanied by a question or remark.
Title

The teacher may allow you to change the name on the entry. Which can be edited if it says "(click to edit)" below the entry name. Keep in mind that longer names may not always be visible on all screens. We recommend keeping the name below 30 characters.
Optional vs required fields
Some fields may be optional. These are indicated with an (optional) tag. For all other fields, you are required to provide content before submitting it.
Categories
Some templates also allow you to add categories. Categories are used to represent learning trajectories, study tracks, or learning goals. Categories can be used to group entries which share a certain attribute, such as the presentational or project skills in the example below.

By clicking on ' Edit Categories' when viewing or editing an entry, you can add or remove categories. If it does not show this button, it is restricted for that template by your teacher.

Learn more about categories and how to manage them
Submission
Once you are satisfied, you can click 'Submit' in the bottom right corner of your entry to share your entry with your teacher.
After submitting, you may convert it back to a draft to make further changes.
Once the entry is graded, you can no longer make any changes.
Warning
Converting a submitted entry to a draft will make the entry invisible to your teachers until you submit it again.